The compressor can easily become the most expensive item on your airbrushing setup list. There is a vast range and many compressors that claim to be airbrush compressors but are not suitable for freehand airbrushing.
The three main components of the compressor are:
- Tank
- Motor
- Air Regulator
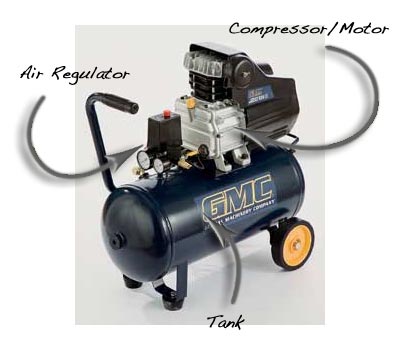
Compressor Tank
For the purpose of free-hand airbrushing, it is strongly recommended by Airbrush Tutor that you purchase a compressor with a tank!
Some models advertise as ‘airbrush compressors’, but these are not designed for continuous use.
Having a compressor/tank assembly kills two birds with one stone – it ensures that your compressor motor gets a rest, and it also means that you get a more consistent airflow.
It is recommended that a compressor with a minimum 2.5ltr tank is purchased. This is the equivalent of about 2/3rds of a gallon.
Compressor/Motor
The two main types of motors are the oiled and oilless.
In general oiled compressor motors are more robust, require less maintenance, and are not so sensitive, whereas oilless motors may not last as long, they tend to be much quieter.
The motor’s power is not so important when it comes to airbrushing. It simply needs to have enough power to fill up a tank.
If you are not getting a stand-alone compressor, there is no need to look too far into the motor’s power rating.
In general, you will be looking in the range of 1/6th HP to 2.5 HP for compressors with large tanks.
Air Regulator
This allows you to adjust the air pressure being fed into the airbrush. You want pressures coming through your airbrush of between 20 psi – 40 psi. Depending on the paint and conditions, 30 psi is usually the perfect pressure to spray with.
Moisture Trap
Be sure to include a moisture trap in your setup.
Whether it’s at the compressor or a baby fitting, as shown in Tutorial 1: How to set up an airbrush space, it is very important to have one as they will stop oils, moisture & impurities from getting onto your artwork.
This is especially important for automotive artworks.
Which compressor then?
For hobby airbrushing, it is preferable to have a portable compressor, meaning that you want something small.
Fortunately, if you are getting a small compressor with a tank attached, there are a few options.
- The cheap way would be to buy an everyday compressor from the local hardware store. A typical ‘GMC’ compressor is pictured above, and for the price, it is hard to beat. These compressors often come with a warranty and can put up with much punishment.
The disadvantage of this type of compressor is the noise. They are extremely loud running whilst filling the tank, approximately 30 seconds out of every 10 mins.
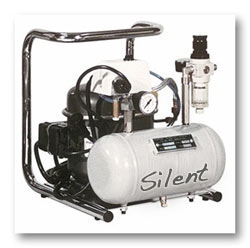
- The pricier alternative is to go for a silent air compressor.
These aren’t a necessity, but they are extremely pleasant to work with and make airbrushing much more comfortable. - The disadvantage to this type of compressor is that they are quite fragile. They are less robust, need to be handled with care, and can tend to overheat after long periods of usage (over 2 hours continuous).
If possible, it is recommended to go for a good quality silent compressor such as the one pictured (above). They are portable, can be used in public places, and make little noise, making them more practical.
However, if the cheaper option is all that is available to you, then a budget GMC-type compressor will suit your needs just fine.