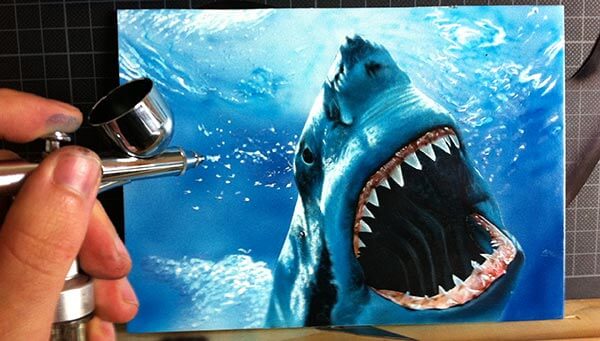
This article is written for those who want to begin freehand illustration airbrushing.
‘My Airbrush Won’t Work!’
One of the most common messages I receive from people crying out for help is sorely repeated – my airbrush won’t work!!
I’ve seen people leave airbrushing entirely with a digital airbrush suicide note explaining why they’re giving up on the hobby and how much frustration they’ve gone through.
Cause of these issues
Poor/ low-cost equipment, of course.

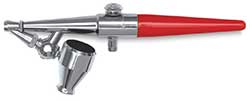
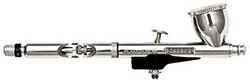
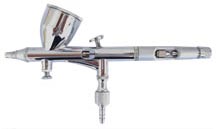
The top image is very similar in appearance to the image immediately below. There’s one minor difference; the price.

While the top airbrush you will find from e-commerce stores such as eBay or packaged with cheap airbrush kits and retailing for around $22, the below airbrush by Iwata is available from online retailers for around $540.
To make an airbrush so cheap, there must be a few price cuts – the materials used in the process, the design, and the manufacture. If you are lucky enough that the cheap airbrush functions as an airbrush, I guarantee it will be short-lived.
This lack of equilibrium appears to work both ways; however, as writing this article, I hop on eBay to look for examples of cheap airbrushes and came across this:

A MasterG22 airbrush, with a no-name oilless compressor without a tank – a less-than-ideal combination of tools for illustration airbrushing. All this for the not-so-bargain price of $620. This could buy you some top-end equipment.
While there are many instances in life where we are simply being ripped off and can often find cheaper solutions that work just as well- in my humble opinion, the airbrush industry isn’t one of these (except in the case of the picture immediately above).
I do see success stories of people finding bargains, and I do see people buying cheap equipment and saying that it works great. However, I also see a lot of ‘it was working well..’ or worse when the item doesn’t work out of the box.
Why are some airbrushes more expensive than others?
An airbrush is an extremely sensitive, highly engineered, fine-tuned product.
The number of coils in the trigger spring, the finishing material to plate over the brass (or other material) body, and the material for a solid, fine-tipped, non-wearing needle, not to mention the precision required to create such a straight point. 2mm threads, Teflon seals in place of rubber, cut away handles, and side feed cups that stay in place – all facets of the engineering process.
Take a look at some of the energy put into the research by Zsolt and Co. Here on the design of a ‘super micron.’
An absolute mountain of design and research goes into making an airbrush, and good, consistent build quality needs to follow for a product to succeed in the market. The higher quality of the materials used and their method of manufacture (tampering, plating, etc.) all contribute to the final production and hence the sale cost of an airbrush. You get what you pay for.
The Sad Truth.
Unfortunately, this hobby is only available to a lucky few due to economic instability. Because of this, some companies produce airbrushes aimed at those in a more challenging economic position. I receive messages saying help is needed because the paint is bubbling into the cup, no paint is coming out, or the trigger action is rough. Upon asking what brand of airbrush has been purchased, I’m told it’s a generic brand purchased from a reseller of a large e-commerce site.
Instead of looking at these airbrushes, I would encourage people to wait and save. If you can afford $20 this week for a cheap airbrush, then your best bet is to save that $20 until you have between $80 and $120 for a good quality entry-level airbrush, as I recommended in the links below.
Recommended beginner airbrushes based on quality and affordability
Iwata Revolution Range

Iwata Eclipse Range

Badger Krome

What types of airbrushes are out there?
The two most distinguishable airbrush classes are the double-action and single-action airbrush. I use a double action, and for the purpose of this website, it goes against the rules to use a single-action airbrush over which you have little control.
Single action
Single action means pulling the trigger back to allow paint and airflow simultaneously in one action. These are the cheaper model-hobby painting types of airbrushes. With single-action airbrushes, the user has little control over paint flow as it is generally only adjusted by changing a setting on the back handle.
Double Action
A double-action airbrush operates with two different functions.
- Step 1. Push down on a trigger to open the air valve, and the air begins to flow out of the nozzle of the airbrush.
- Step 2. While the air valve opens, one pulls back on the trigger for paint flow.
The reason for using double action is that it allows for much greater control of the airbrush. As you learn in the video tutorials, the air must flow before paint. You always push down on the airbrush first for air, then pull back for paint.
This site focuses on airbrush art or freehand airbrushing, and some artworks are extremely detailed, which is something that a single-action airbrush will struggle to do.
From here, there are two main types of double-action airbrushes – the gravity fed & the siphon fed.
This comes down to a matter of preference. The most obvious difference between gravity-fed and siphon-fed airbrushes is how the paint is stored and fed.
Siphon fed airbrushes
Siphon-fed airbrushes generally allow the user to hold more paint and longer spraying times without changing colors. Having a bigger paint jar also means it can be difficult to get close to the surface of the substrate.
Siphon-fed airbrushes also require a slightly higher air pressure to siphon the paint from the jar.
One strong advantage of this type is that you can use your second hand to hold the paint jar allowing for slightly better control. Another advantage of this type of airbrush is that you can change colors faster than gravity-fed types.
Gravity fed airbrushes
Gravity-fed airbrushes have a small paint cup manufactured on top of the airbrush – some even have such a small cup that you pour the paint directly into the airbrush.
These airbrushes require lower air pressure to operate, and some may argue that you can achieve finer detail because of this. They aren’t as comfortable to hold as siphon-fed airbrushes. However, it is easier to airbrush for longer periods of time as they aren’t as heavy as a siphon-fed airbrush.
Mediums & surfaces
With the right paint flowing through the airbrush, it is possible to paint almost any surface.
These surfaces can range from paper to people to tree bark. This is one of the strongest advantages of this modern art tool.
Papers & cardboards
The most common mediums for airbrushing are thick paper and cardboard. This is because they require no effort to prepare and can last a very long time. Below is a brief list of the most readily accessible/most highly recommended art papers and boards:
- High GSM paper
- Mat board
- Cardboard
- Foam core board
GSM stands for grams per square meter. High gsm paper is anything above 110 GSM.
Mat board is simply compressed sheets of paper. It’s similar to cardboard but a little denser and a bit nicer to work with because of this. It isn’t as absorbent as paper, but you can still smash thick paints onto it.
Foam core boards are cheap and present well. The only disadvantage to these is that they’re fragile and warp easily. When purchasing foam core board, buy a variety that is cardboard/paper on the outside – as some foam core boards have a thin plastic layer making it very difficult to use with water-based paints.
Textiles
Clothing or any fabrics can be considered as textiles. The main advantage to using these as a medium is that they’re fun to paint because you can seriously hammer down the paint. They are very absorbent. The only preparation necessary would be to wash any textiles containing loose fibers. If these fibers fall off after painting, you will see the base color come through, which can age the artwork prematurely.
Wood
Wood is also quite absorbent but seems to be so after some time. Anything painted on wood without the appropriate primer will have a matte finish. Be sure to clean the wood before use to remove any loose particles. If the wood has been primed, then be sure to lightly sand the primer to give adhesion to the overlying paint job.
Automotive and color bond steels
Automotive surfaces are arguably the most fun to work on – unfortunately, they are the most difficult to prepare. They can range from thin steel to thick plastics.
Here is a quick insight into what is required in the correct surface preparation of bare steel surfaces for automotive applications:
- The steel must first be cleaned thoroughly with a wax and grease remover, and any other materials should be removed from the steel.
- Machine sanding should be done with 80-grit sandpaper.
- The steel should be blown off and wiped again with wax and grease remover to eliminate all particles.
- An etch primer needs to be applied.
- Before the etch primer cures, another primer, known as a primer filler, should be applied.
- After the primer filler has dried and cured, it should be sanded flat (finishing with 800 – 1200 grit sandpaper) for the basecoat’s application.
- Application of wax and grease remover once again.
- Apply basecoat and airbrush artwork using tack cloth between layers. Avoid touching the surface with bare skin, and try not to paint in a room containing silicon products that could contaminate the artwork.
- Clear coat.
- Buff if required.
It is often difficult for beginners to start using automotive paints, as correct surface preparation is the most important of all factors.
Painting on automotive surfaces is best left to qualified professionals and is not recommended for beginners.