
How to Teach Children the Alphabet
After many years of introducing kindergarten students to the 26 letters and their sounds, I found that 3 simple principles helped all students learn this information quickly and easily.

Introduce the letters in a particular order
When introducing your child to the 26 letters and each letter’s sound(s), do not simply begin with A. Working in alphabetical order is not the most effective way for a child to learn the sounds made by each letter. I recommend the following order instead:
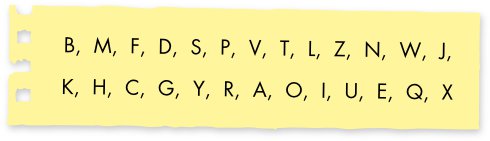
I suggest this order for the following reasons:
- Easy sounds first. It is easiest for children to feel, hear, identify and produce sounds that are formed with the lips, teeth and forward tongue position (where the tongue touches the teeth). This is because children are able to use their sense of sight when they watch others forming the sound. Alternatively, sounds that are formed at the back of the mouth (such as the sounds made by the letters K, G, and Y) are hard for children to mimic as they cannot observe how your mouth and tongue are moving when you form the sound.
- Complex letters last. Each vowel makes numerous sounds (or is even silent) depending on where in the word the vowel appears. Also, there are only slight differences between the sounds made by many of the vowels, such as the vowel sounds in the words “cat,” “cut” and “cot.” As a result, learning the individual sounds each vowel makes is a complicated skill. In fact, some speech pathologists believe that a child’s “ear” is not developed enough to distinguish vowel sounds until age 5 or 6. By introducing consonant sounds first, a child will have the opportunity to practice listening to sounds which are easier to identify before attempting to identify the more subtle sounds made by the different vowels.
- No similar sounds one after another. After rearranging the letters in order of complexity from least complex to most complex, it is important to avoid introducing two letters around the same time that make similar sounds. For example, consider the letters P and B. Both letters make sounds (“puh” and “buh”) which are primarily formed by lips. For children still working to develop their auditory processing skills, it may be difficult to identify and differentiate between similar sounds when they are introduced shortly after each other.
Plan for the complex
Most children are satisfied with basic instruction about the sound(s) each letter makes. However, some children, particularly older children, may ask for additional clarification since they may have already noticed some of the confusing subtleties about the sounds some letters make. If your child is one that likes to ask follow-up questions, here is a list of explanations seasoned teachers typically provide to children to help answer their questions:
- All vowels can be “long” or “short.” When a vowel is “long,” it sounds like the name of the letter. For example, the “long e” in “she” or the “long i” in “sight.” When a vowel is “short,” it makes its own sound. For example, the “short e” in “met” or the “short i” in “bit.”
- The letter G can be “hard” or “soft.” When it is hard, it has its own sound, which you make without closing your teeth. An example of a “hard G” is found in “gate.” When it is “soft,” the letter G borrows the sound made by the letter J, which requires you to close your teeth slightly when forming the sound. An example of a “soft G” is found in “giraffe.”
- The letter S can be “hard” or “soft.” When it is soft, it has its own sound. An example of a “soft S” is found in “sat.” When it is “hard,” the letter S borrows the sound made by the letter Z. An example of a “hard S” is found in “toes.”
- The letter C can be “hard” or “soft.” In both cases, the letter C borrows its sound from other letters. When the letter C is “soft,” it borrows the sound made by the letter S. An example of a “soft C” is found in “race.” When the letter C is “hard,” it borrows the sound made by the letter K. An example of a “hard C” is found in “cat.”
- The letter Q does not have its own sound. Instead, the letter Q makes the sound of a K and a W together, KW.
- The letter X makes the sound of a K and an S squished together, KS.
- The letter Y has three sounds. One sound is all its own and the other two sounds are borrowed from other letters. When the letter Y is in the beginning or middle of a word, it makes its own sound, as in the word “yellow.” When the letter Y is at the end of a word, it borrows the sound of a “long E,” as in the word “putty,” or a “long I,” as in the word “try.” The sound made by the letter Y is a very complicated concept for children to learn, which is why this letter is one of the last consonants I suggest introducing.
Let your child set the pace
Many parents often introduce their children to letters and their sound(s) in hopes of helping their children learn to read. For children who are developmentally ready to read, a parent’s efforts can lead to very positive results. However, when children are pushed to read before they are ready, they are set up to fail. Strong letter and word awareness skills must combine with strong phonemic awareness skills for a child to be developmentally capable of reading. If a child does not have strong skills in both of these areas, he will likely become frustrated by the process. When this happens, he runs the risk of beginning a self-fulfilling cycle of failure by struggling to match each letter with its sound(s) and incorrectly believing he is “bad at reading.”
Exposing your child to letters and their sounds at his own pace will give him an important opportunity to begin building confidence in his abilities. This confidence will lead to increased perseverance and, ultimately, an increased incidence of success when he is ready to begin reading. In this way, early practice with your child, when done at his own pace, will position him to begin a self-fulfilling cycle of success.
Try this at home
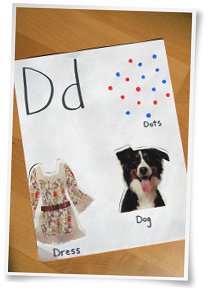
When introducing a letter and its sound(s) to your child, write the uppercase version of the letter at the top of a large piece of paper. Then, together with your child, draw or glue pictures of words that start with that letter’s sound on the same page.
For older children, or those with well-developed phonemic awareness skills, try looking through children’s magazines and selecting and cutting out the pictures together. They will likely be able to scan numerous pictures at a time and select only those that begin with the correct sound. They may also be able to think of a picture that begins with the correct sound and draw it freehand. For introducing a letter and its sound to younger children, consider cutting out or drawing pictures yourself, because younger children may be unable to identify pictures as quickly or accurately as older children are able to.
Consider taping these completed “letter pages” to your child’s bedroom wall or refrigerator door (at his eye level) so your child can review each letter and the corresponding sounds in a casual way as he walks around your home. Also, having the pages on display encourages your child to share the letters and their sounds with other family members or visitors, which is another opportunity for him to practice.
What can you share with other parents?
How did you introduce each letter and its sound? Any fun letter activities you can share with us? What letter’s sound did your child have the most difficulty learning? Did you develop any shortcuts or tricks to help your child get over that stumbling block? Please share your experiences with us and readers like you in a comment below.