
Early Childhood Development: Fine Motor Skills
Fine motor movements involve the coordination of small muscles in the hands and fingers. Strong fine motor skills are essential to complete tasks such as writing, cutting, using a fork or spoon, threading beads, moving puzzle pieces, zipping, buttoning, and tying shoe laces. Without well-developed fine motor skills, a child may have difficulty learning to write or performing many of the other critical tasks presented in the preschool and kindergarten classrooms.
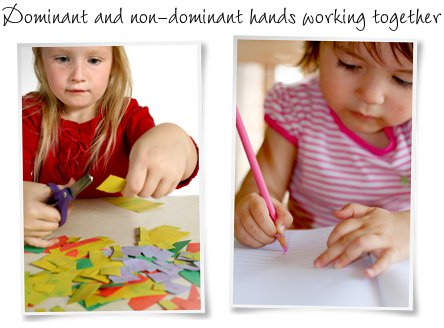
Role of the Dominant Hand and Non-Dominant Hand
As discussed in the section on Gross Motor Development, asymmetrical bilateral integration is the ability to simultaneously move both hands in different motions to complete a single task.
Nearly all fine motor activities, including cutting and writing, require a dominant hand (being left-handed or right-handed) and a non-dominant hand. Hand dominance can be seen as early as age three or four, although it may not be firmly established until a child reaches age six or seven. Once a child becomes comfortable with one hand as the dominant hand, the remaining hand becomes the non-dominant hand by default. While the dominant hand performs tasks such as using a pencil or scissors, the non-dominant hand acts as the “stabilizer.” For example, one hand holds the scissors when cutting while the other hand moves the paper.
Importance of the Proper Pincer Grip
The “pincer grip” is a common term among elementary school educators, therapists, and doctors. Simply put, the pincer grip is the grasp used by the index finger and thumb to pinch a shoe lace, a cereal puff, or a pencil.
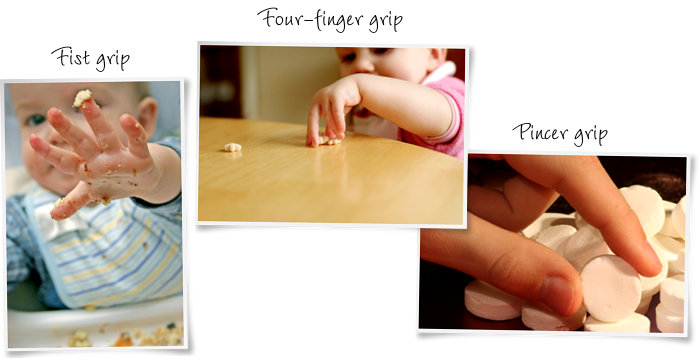
There are typically three different grip styles children use as they develop fine motor skills:
- Fist grip. Children younger than one year old typically reach for and hold items with their entire fist. When using a pencil or crayon, a young child will hold the item in their closed fist with their pinky closest to the paper and thumb on top.
- Four-finger grip. As children gain fine motor control, they typically progress from using a fist grip to a four-fingered grip. With a four-fingered grip, a child uses all four fingers together to hold an object against his thumb. This grip gives a child greater control when holding small items (or self-feeding), but it is still clumsy and inefficient.
- Pincer grip. Once children develop strong fine motor skills, a true pincer grip emerges. With this grip, a child uses only his thumb and index finger to hold and manipulate small objects. With a pincer grip, a child can easily twist dials, turn the pages of a book, open and close a zipper, and use crayons or pencils with precision.
Tips and Tricks If Your Child Struggles with the Proper Pincer Grip
It takes time and practice for children to strengthen the muscles used in the pincer grip. If your child has difficulty mastering the pincer grip, consider these few steps:
- Demonstrate the proper pincer grip for your child, using only your thumb and pointer finger to pick up small objects. Exaggerate your movements so your thumb and pointer finger open as wide as possible before closing on the small object. Also, keep your three remaining fingers (middle finger, ring finger and pinky finger) tight against your palm, so only your thumb and pointer finger are doing the work.
- Serve finger food either as a meal or a snack. Ask your child to pick up the small pieces of food with his fingers (even though he may be fully capable of using a fork or spoon). There is really only one way to pick up grapes one at a time without a fork, so if you ask your child to pick up one grape at a time, you are guaranteed to get the proper pincer grip.
- Direct your child to paint on a vertical surface, such as an easel. (Consider taping a large piece of paper to a door if an easel is not available.) Holding the paint brush up to a vertical surface will force your child to flex his hand back at the wrist. This motion automatically puts the forefinger and thumb into position for the pincer grip.
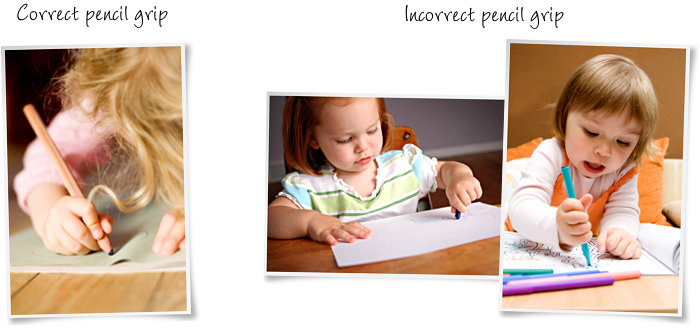
Importance of the Proper Pencil Grip.
The correct pencil grip involves holding the pencil between the thumb and pointer finger, and resting the pencil on the middle finger for added stability. Since a child’s natural inclination is to hold a pencil with his entire fist (pinky finger closest to the paper and index finger and thumb on top), the proper pencil grip must be actively taught.
Since writing comfortably is a skill your child will use throughout his lifetime, it is wise to help your child develop a comfortable and efficient pencil grip when he is young. Also, it is much easier to learn to hold a pencil correctly at the start than it is to unlearn an improper pencil grip and retrain muscles to learn the proper grip once your child is older.
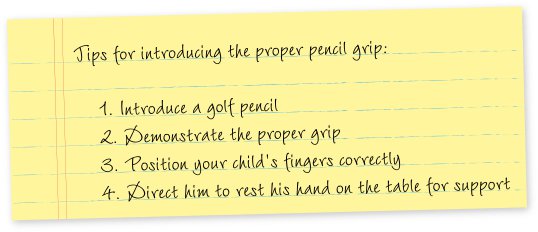
Tips and Tricks for Teaching Your Child the Proper Pencil Grip
- Put down the regular sized pencil and grab a golf pencil. Golf pencils are typically half the length of standard pencils and, as an added convenience for parents, come pre-sharpened. Since they are smaller and lighter than the average pencil, they are the perfectly sized writing utensil for all children under the age of six or seven.
- Demonstrate the proper pencil grip for your child before handing him the pencil. As you do, say aloud where you are placing your fingers. Show him how you are able to easily control the pencil with that grip.
- Place the pencil into your child’s hand and position his fingers correctly. Start by having him pinch the pencil with his thumb and index finger approximately half an inch above the sharpened point. Once he can support the weight of the pencil with those two fingers, direct him to “rest” the pencil on his middle finger for added support and control.
- Once your child is holding the pencil with the correct grip, direct him to rest the side of his hand closest to his pinky on the paper. Show him how to use his non-dominant hand to stabilize the paper so it remains steady as his dominant hand does most of the work.
One word of advice: As your child is learning the correct pencil grip, do not be tempted to give him an oversized (or “jumbo”) pencil or crayon. While often marketed as “preschool materials,” the oversized pencils and crayons are, in reality, more difficult for little fingers to grip. Asking children to hold these jumbo crayons and pencils is similar to asking an adult to write with a broom handle. Just as we could not easily write a letter using a broom handle as a pen, it is difficult for a child’s small hand to control a jumbo-sized pencil or crayon.
Importance of the Proper Scissors Grip
Like the proper pencil grip, the proper scissors grip must be actively taught. This is because the proper scissors grip is completely unlike any other grip your child has likely used. Most children explore with their hands outstretched and their palms facing downward. Or, as they get older, they default to holding small items with their thumb and pointer finger (the pincer grip!). The proper scissors grip requires a child to rotate his hand so that the thumb faces upward and the pinky finger points at the floor. Then he must spread his thumb and pointer finger as far apart as possible while using his palm to help stabilize the scissors.
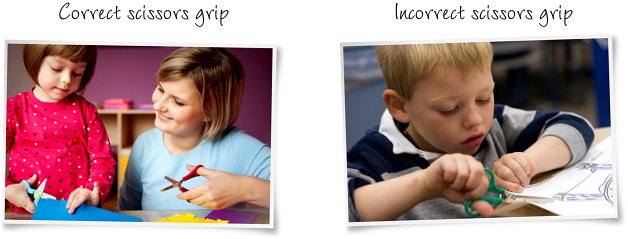
As if the proper scissors grip wasn’t complicated enough, your child must also rely on his non-dominant hand to stabilize the paper while his dominant hand uses the scissors. When first learning to use the scissors, the non-dominant hand will simply hold the paper in a stable position as the dominant hand moves the scissors forward. But, as your child begins cutting more complex designs, his non-dominant hand will be responsible for twisting and turning the paper as the dominant hand operates the scissors.
Tips and Tricks for Teaching Your Child the Proper Scissors Grip
Most children become interested in using scissors around age two and a half or three. When you notice your child’s interest, consider these tips to help him quickly master the proper scissors grip:
- Allow your child to practice holding the scissors without trying to cut paper. Since learning to simply hold the scissors correctly is a challenging task, let your child pick up and put down the scissors as many times as he wants before you actually begin teaching him how to use the scissors.
- Direct your child to spread his index finger and thumb as widely as possibly, explaining how this motion makes the blades of the scissors open really widely. Then encourage him to close the scissors in one smooth motion. This will help him to make long, smooth (efficient) cuts rather than short, choppy (inefficient) cuts.
- Stay close by and provide constant feedback and guidance until the proper grip is automatic for your child. Little ones often find cutting to be a complex and challenging skill that only becomes comfortable with frequent practice. So, especially in the beginning, your child may need constant verbal reminders of how to move his fingers when using scissors. Without this guidance, he will likely revert to an incorrect grip (or to use both hands to open and close the blades of the scissors) which will allow him to cut but without any precision or efficiency. And the longer he is allowed to use an incorrect grip, the more difficult it will be for him to unlearn those habits and learn the proper scissors grip.
If these three steps don’t seem to be working for your child, consider this last tip: Ask your child to shake your hand. When shaking your hand, your child will naturally rotate his hand so that his thumb goes top and his fingers extend below (pinky finger is closest to the floor). After shaking hands a few times, have your child reach out to shake your hand one last time. This time, pick up a pair of scissors by the closed metal teeth and place the end of the scissors with the finger holes into his outstretched palm. Help him put his thumb in the large circular loop on top and one or two fingers in the larger loop on the bottom.
When I first taught my son to use scissors, I instructed him to say, “nice to meet you, scissors” and pick up the scissors as if offering to shake someone’s hand. He loved this game and while I’m sure parents of his classmates thought he had a vivid imagination, his preschool teacher just laughed and told me later she completely understood why he greeted his scissors that way (and that he used the scissors very well!).
Tips for Accelerating Your Child’s Fine Motor Development
Most fine motor activities require children to move their hands and fingers in unfamiliar ways. The best starting place for accelerating your child’s fine motor development is to help him strengthen his pincer grip.
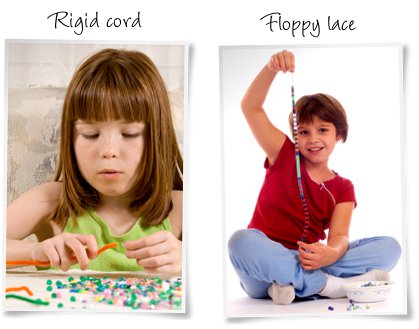
Consider investing in some low-cost beads of different sizes, where the largest is approximately 1 inch in diameter and the smallest bead is approximately 1/4 inch in diameter. Using a rigid cord (a pipe cleaner works well), have your child use his thumb and pointer finger to pick up a large bead and thread it on the cord. As your child gains comfort with this activity, gradually introduce smaller and smaller beads which are more challenging to hold and manipulate. While his dominant hand manipulates the beads, direct him to use his non-dominant hand to hold the cord steady.
After your child is able to easily thread the smallest beads on the rigid cord, replace the rigid cord with a floppy shoe lace or string. This floppy lace will provide your child with a “moving target” as he tries to thread the bead with his dominant hand and steady the cord with his non-dominant hand.
For older children who are already comfortable with the proper pincer grip, focus on helping your child gain a strong pencil and scissors grip. As a starting point, print some printable tracing worksheets and direct your child to trace over the lines, curves and shapes. Or, to make homemade worksheets, use a yellow marker to draw the shape and then have your child trace your lines with a blue or red marker to see the shape magically turn a different color. Tracing not only requires a strong pencil grip to hold the pencil or marker, but it also requires strong coordination of the muscles in the hand to stay on the narrow line while tracing.
After your child finishes tracing, have him use scissors to cut out the shape. Begin with simple lines and curves and then move to basic shapes, such as circles or ovals, and then to more difficult shapes such as triangles, squares, and other multi-sided shapes. (When cutting a circle, your child can cut continuously while slightly turning the page in his non-dominant hand. When cutting a triangle or square, his dominant hand needs to cut, then stop, wait for his non-dominant hand to pivot the paper 90 or 60 degrees, and then resume cutting. When cutting a multi-sided shape, the start-then-stop-then-start-then-stop process repeats even more frequently and requires even more coordination between the dominant and non-dominant hand.) We have a variety of printable cutting worksheets you and your child might enjoy.
Learn More About What Will Be Expected of Your Child in School
Children participate in a variety of fine motor activities in preschool and kindergarten, including drawing, cutting, bead threading, and writing. When children begin preschool, they are expected to be able to write a few letters, usually those in the child’s first name, and use scissors to cut in a straight line. By kindergarten, a child’s fine motor skills are expected to progress to the point where he is able to accurately write all 26 letters, the 10 number symbols, and his full name with all letters in the proper order as well as cut straight lines and simple curves. By the end of kindergarten, children are expected to be able to cut out complicated shapes or figures, tie their own shoes, and color “within the lines.”
Expectations and Milestones – Fine Motor Skills
Beginning of Preschool
When children begin preschool, they will be asked to draw, paint or use crayons on a daily basis. Children should be able to use crayons, pencils and paint brushes comfortably using the proper grip. At the start of the year, drawings typically consist of imprecise scribbles “outside the lines.” This is normal and children will improve on their accuracy as their fine motor skills develop during the year.
Children are expected to at least attempt to write their first names using upper case letters. Children may print some letters in reverse (such as writing a J as an L). This is a common mistake as children learn to print letters. Practice with the correct model will eventually correct any mistakes as your child’s fine motor skills progress.
Preschool teachers expect students to hold scissors correctly and be able to cut on a straight or slightly curved line with moderate accuracy. Children are expected to handle small pieces of paper and paste them on larger sheets. Children are also expected to manipulate beads or other small items by threading them on a lace or rope (where the dominant hand holds the bead and the non-dominant hand holds the lace).
Beginning of Kindergarten
At the beginning of the kindergarten year, children are expected to be able to properly print their first name in upper case letters. Children may still be forming some letters incorrectly (such as flipping a J to look like an L), but this should be happening less and less frequently. Children may be attempting to write their last names and, depending on the number of letters in their name, may be successful. They should be able to accurately copy a few words from a teacher’s example placed on their work table. (Copying words from a model on a chalkboard is a more challenging task and is a skill that is developed only by the end of the kindergarten year.)
Children in kindergarten are expected to use crayons with control, staying close to the lines and adding color with small, precise movements rather than with large scribbles. Drawings should be colorful and recognizable with detailed figures and objects. Children should also comfortably handle small objects such as counting rods, beads, or beans and easily manipulate buttons, snaps and zippers on clothing. Children are expected to cut along a printed line to cut out pictures or shapes. Children should use their dominant hand to open and close the scissors and then use their non-dominant hand to turn the paper.
During the kindergarten year, children should begin tying their own shoes. Shoe tying is a complicated skill for young children as it requires extremely precise movements from a child’s little fingers. While this may differ from teacher to teacher, a general guideline among my colleagues is that teachers assist with shoe tying until the Thanksgiving break or winter break of the kindergarten year. After that time, children are expected to tie their own shoes. (While each teacher may have a slightly different style, I instruct parents to first teach their child how to tuck one lace under and around the second lace to make a half-knot. Then to make two long loops (bunny ears) with the laces and repeat the “loop over and tuck through the hole” motion – known to many as the “around the tree and through the hole” method – to finish tying the laces.) Children should handle buttons and snaps on clothing with increasing independence and be able to dress themselves with pull-on clothing.